
Retro Cornflake and Jam Tart
This classic retro cornflake and jam tart was once a staple of British school dinners, especially throughout the 70s and 80s. With a shortcrust-like coconut flour pastry, a sticky jam centre, and a crunchy golden cornflake topping, this naturally gluten free version is a delicious twist on the original.
Whether you remember it from your own school days or you’re discovering it for the first time, this nostalgic dessert is sure to win you over.
This cornflake and jam tart was first published on the Culinary Jumble in March 2016. The recipe (and images) remain unchanged.

What is retro cornflake and jam tart?
Cornflake and jam tart is a beloved British dessert that was a staple of school dinners across the UK, especially during the 1970s and 1980s. If you went to school in Britain during those decades, chances are you’ll remember this nostalgic sweet treat being served up by dinner ladies alongside a generous ladle of custard.
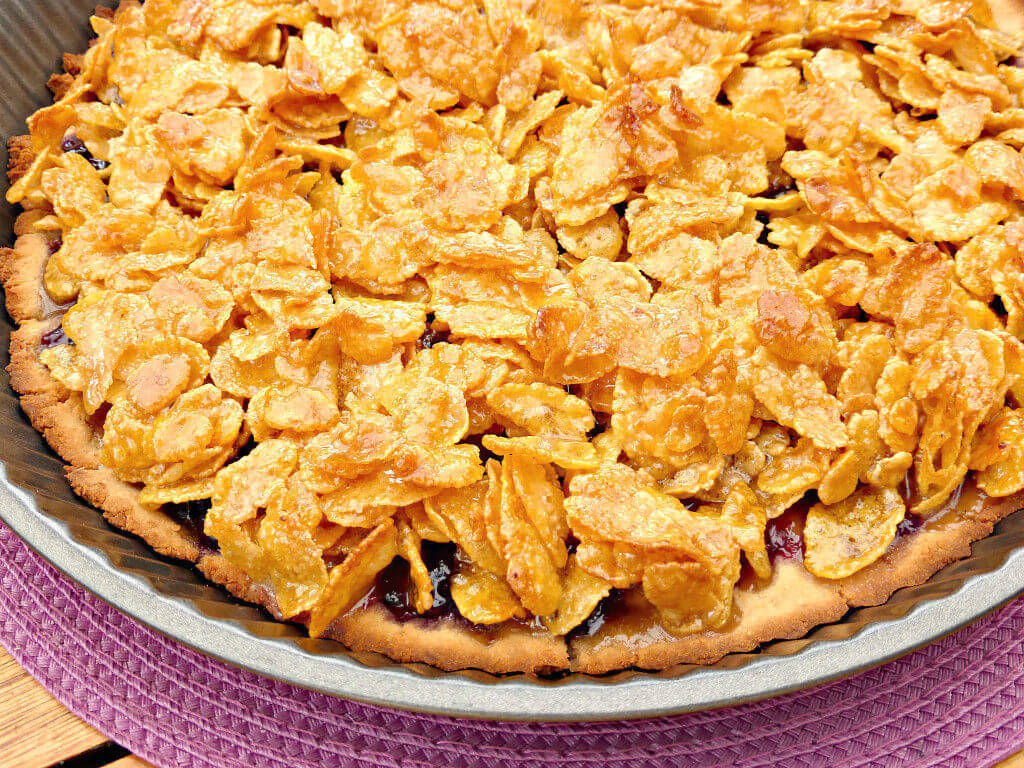
The dessert consists of three simple layers: a buttery shortcrust-style pastry base, a layer of sticky, sweet jam, and a topping of crunchy cornflakes coated in golden syrup. It’s a wonderfully simple, but comforting pudding that brings back memories for many. And if you didn’t grow up with it, this tart is a charming slice of British culinary history that’s easy to fall in love with.
Once found on almost every canteen menu in the country, this classic jam and cornflake tart remains a favourite today among those who crave old-school puddings. It’s perfect for reliving childhood memories or introducing younger generations to one of the UK’s most iconic school desserts.
Gluten free cornflake tart
This recipe uses a gluten free pastry base made with coconut flour, which is quite different from the traditional wheat flour crust typically found in classic cornflake and jam tarts. Coconut flour is naturally gluten free and provides a tender, slightly crumbly texture that pairs perfectly with the sweet jam and crunchy cornflake topping.
Unlike regular wheat flour, coconut flour absorbs much more moisture and can make dough denser if not balanced with enough liquid and fat. This means it behaves differently when baking, requiring a careful balance of ingredients to achieve a light yet sturdy pastry. Despite these differences, coconut flour works wonderfully in pastry, giving this tart a unique texture and subtle sweetness that complements the other flavours beautifully.
I developed this version while following a strict gluten free diet, so it’s ideal for anyone avoiding gluten but still craving that nostalgic school dinner flavour. Be sure to follow the recipe closely for the best results.
Alternative gluten free flours
If coconut flour isn’t your favourite or you want to try a different gluten free option, there are several alternative flours that work well for making pastry bases. Each has its own unique properties, so it’s important to choose one that suits your taste and baking style.
Almond flour is a popular choice for gluten free baking. It adds a rich, nutty flavour and creates a tender, moist pastry. However, almond flour is denser and contains more fat than coconut flour, so you may need to adjust the amount of butter or eggs in the recipe slightly.
Rice flour is another good gluten free option with a mild flavour. It’s lighter and less absorbent than coconut flour, so it can create a crisper pastry, but it might lack some of the richness that coconut or almond flour provides.
Oat flour (make sure it’s certified gluten free) offers a slightly chewy texture and mild sweetness. It’s great for adding body to pastries, but it can be a bit crumbly if used on its own, so blending it with another gluten free flour can improve results.
Because gluten free flours behave differently from traditional wheat flour, it’s often helpful to use a blend rather than just one type. Many gluten free all-purpose flour blends are available that combine several flours and starches for balanced texture and flavour.
When experimenting with alternative flours, keep in mind that adjustments to liquids and binding agents (like eggs) may be needed to get the pastry just right.
What is coconut sugar and can it be substituted?
Coconut sugar is a natural sweetener made from the sap of coconut palm flower buds. It has a light caramel flavour and a soft brown colour, which adds a subtle richness to baked goods. Although it’s often marketed as a healthier alternative to white sugar, it’s still a form of sugar, just slightly less processed and with a lower glycaemic index.
In this cornflake tart, coconut sugar adds a mellow depth to both the pastry and syrup topping. But if you don’t have any to hand, don’t worry, it’s easy to substitute. You can swap coconut sugar 1:1 with:
- Light brown sugar
- Raw cane sugar
- Regular granulated sugar (white)
- Maple or date sugar (if you want to stay in the less refined camp)
Each will give a slightly different flavour and colour, but none will drastically alter the outcome. The recipe is flexible, so use what you have and what fits your preferences.
Can I make a spelt flour crust?
I haven’t made this cornflake tart with spelt, but it’s definitely on my to-do list. I often talk about the fact that you can take pretty much any recipe and do a straight swap with spelt flour. However, the original recipe uses coconut flour and as this has rather particular properties, I would not recommend you attempting to use something else in its place.
If you’re not following a gluten free diet and would prefer to use spelt flour, here’s a simple shortcrust-style alternative that works beautifully for this tart:
- 175g (1⅓ cups) white spelt flour
- 100g (7 tbsp) cold butter, cubed
- 1–2 tablespoons coconut sugar (or regular sugar)
- 1 egg yolk
- 1–2 tablespoons cold water (as needed)
This version is buttery and flaky with just a hint of sweetness. Perfect for holding up against the sticky jam and syrupy cornflake topping. I recommend chilling the dough before pressing it into the tin, just as you would with the coconut flour version.
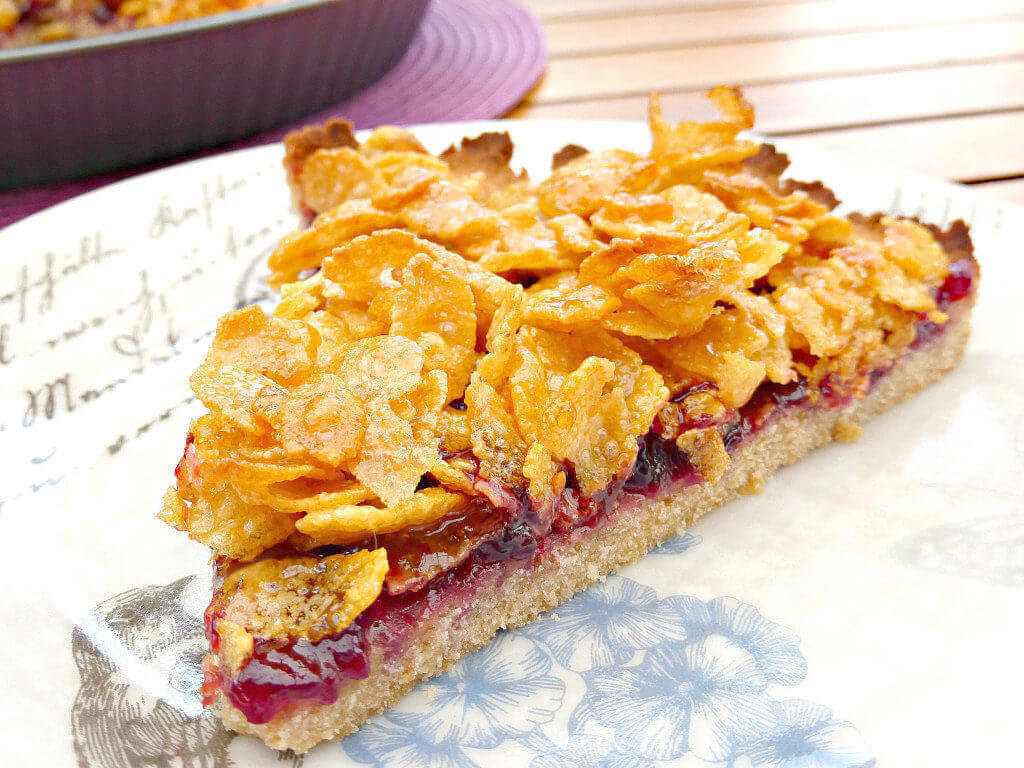
What is the best jam for a cornflake tart?
Traditionally, a classic school dinner cornflake tart uses simple strawberry or raspberry jam. Nothing fancy, just sweet, bright, and cheerful. It’s exactly what dinner ladies in the 70s and 80s would have used, and it brings back all the nostalgic charm of those canteen desserts.
If you’re after that authentic retro flavour, stick to a basic jam straight from the jar. No need to overthink it—part of the appeal is its simplicity.
That said, if you’re leaning towards a slightly healthier twist, my maple syrup berry jam is a brilliant alternative. It’s naturally sweetened, lower in refined sugar, and thickened with chia seeds, which gives it a lovely texture and a subtle citrus tang. It complements the crunchy cornflake topping perfectly and keeps the dessert feeling just a little more wholesome.
Whether you go old-school or modern, the jam layer is what ties everything together: sweet, sticky, and utterly satisfying.
What to serve with cornflake tart
Traditionally, a warm slice of cornflake tart was never complete without a generous ladle of thick, yellow custard. For many Brits, it’s the ultimate nostalgic school dinner combo. That said, I’ll be honest: I can’t stand custard. I never liked the texture or the taste, even as a child, and I still avoid it now.
So if you’re like me and custard isn’t your thing, don’t worry. This tart is just as delicious served on its own or with other toppings. Here are a few alternatives to try:
- A scoop of vanilla ice cream – Perfect when the tart is still warm. The contrast in temperatures is divine.
- Thick Greek yoghurt – A tangy, creamy option that balances the sweetness nicely.
- A dollop of crème fraîche – If you prefer something less sweet with a bit of sharpness.
- Lightly whipped cream – Soft and simple, this keeps things classic but more neutral than custard.
Whether you go old-school or modern, the key is to let the tart shine. It’s rich, sticky, and sweet, and it really doesn’t need much more.
FAQ: Cornflake and jam tart
- How should I store cornflake tart?
Store any leftovers in an airtight container at room temperature for up to 2 days. If your kitchen is particularly warm, keep it in the fridge to help maintain the topping’s crunch. Bring it to room temperature before serving.
- Can I freeze cornflake tart?
Yes, you can freeze it, although the cornflake topping may lose some of its crunch. To freeze, allow the tart to cool completely, then wrap tightly in plastic wrap and foil or place in a freezer-safe container. Freeze for up to 1 month. Thaw overnight in the fridge and reheat if desired.
- How do I reheat cornflake tart?
To enjoy it warm, reheat individual slices in the oven at 160°C (320°F) for about 10 minutes, or in the microwave for 20–30 seconds (though the microwave can soften the topping). The oven is best if you want to retain that crispy finish.
- What can I use instead of golden syrup?
Golden syrup gives this tart its classic sticky texture and nostalgic flavour, but there are alternatives:
- Light corn syrup: closest in consistency but with a milder taste.
- Honey: works well but has a stronger flavour.
- Maple syrup: a more natural option that’s slightly thinner, but gives great taste. Just note the topping may be a bit looser.
- Brown rice syrup: thick and sticky, similar in texture to golden syrup.
Choose whichever option suits your taste or dietary preference. However, for the most authentic retro flavour, golden syrup is hard to beat.


Cornflake and Jam Tart (gluten free)
Ingredients
Pastry (see note 1):
- 100g (⅔ cup) coconut flour (see note 1)
- 2 eggs (medium)
- 1 tbs coconut sugar (see note 2)
- 75g (5 tbsp) butter (melted)
Topping:
- 20g (1 tbsp + 1 tsp) raw brown cane sugar (see note 2)
- 55g (¼ cup) butter
- 120g (¼ cup + 1 tbsp) golden syrup (or any light-coloured syrup)
- 100g (4½ cups) cornflakes
- 100g (3½ oz) jam
Instructions
Pastry:
- Pre-heat the oven to 200°C (400℉).
- Melt the butter and allow to cool for several minutes.
- In a food processor or large bowl, mix the flour, eggs, sugar and melted butter until a crumbly dough forms.
- Grease a pie dish - mine was 27cm (10½").
- Push the dough evenly into the dish (and a little up the sides) using your hands or the back of spoon. The dough is very pliable, so it should be easy to mould it into the dish.
- Place in the fridge for around 10 minutes, just to firm up a little.
- Bake for around 10-15 minutes, until golden at the edges, then remove and allow to cool for around five minutes.
Topping:
- While the pastry is baking, prepare the cornflake topping. Melt the sugar, butter and syrup in a pan until just slightly bubbling. Remove from the heat.
- Gently stir in cornflakes (you want to retain their shape and not crush them).
- Spread the jam over the pastry while it is still warm.
- Top with the cornflake mixture, making sure it is evenly distributed and covers all the jam.
- Return to the oven and bake for an additional 5-8 minutes, until the topping is crispy and feels "set".
- Remove from the oven and either eat straight away (perhaps with its classic companion - custard?) or leave to cool. Enjoy!
Notes
- This recipe was made with coconut flour, which is naturally gluten free. If you would like a pastry using spelt or regular flour, please read here.
- Use any kind of sugar you like: white, brown, coconut or granulated sweeteners. Please read for more information.

2 thoughts on “Retro Cornflake and Jam Tart”
Leave a Reply

How many servings is this? Taking me back to my childhood right now. It looks amazing.
Hi Sarah!
It was quite big – at least 8! Enjoy!