Enriched Spelt Loaves: Tips, Troubleshooting & What to Expect
In this post, we’ll focus on enriched spelt loaves. Everything from how the dough behaves, to proofing, shaping, and baking it successfully.
Enriched spelt dough can be unpredictable, but with the right techniques, you can achieve tender, flavorful loaves with a soft crumb and golden crust.
We’ll also cover common issues like lopsided rises, cracks, and bursts, and share tips for troubleshooting, so you can embrace the quirks of spelt rather than dread them.

Spelt dough: perfection not required
Hands up: in the early days of my blog, if a recipe worked, tasted good, and looked reasonably presentable, that was enough. These days, I no longer bake something once and share it. I’ve become obsessed meticulous about testing, retesting, and perfecting recipes.
A big part of sharing recipes is how they look, and yes, I am a bit of a perfectionist. I want images that make you stop scrolling, click that pin, and swoon a little. But perfection often focuses on things that don’t matter. Take a saffron and clementine bread I’ve been working on: my freezer groans under its weight after weeks of experimental baking. Delicious? Absolutely. Instagram-ready? Not even close.
Here’s a truth bomb: food bloggers can be a little sneaky. Yes, I include myself. I pick my supermodel cookies straight out of the oven, chase the perfect light, and trawl through thrift shops for props like I am on a treasure hunt. Those gorgeous images? Not reality. Comparing your first ever loaf to a Pinterest-perfect shot is like racing a cheetah on roller skates. Unfair and stressful.
With spelt, the quirks are even more obvious. Even the same recipe can behave wildly differently depending on flour, humidity, temperature, or yeast. Your dough may rise higher than expected, barely move, spring aggressively, or settle with blowouts, cracks, or lopsidedness. That’s not failure; that’s spelt being itself. Even wheat breads can surprise you, but spelt just comes with a bit more drama.
At the risk of sounding like a hypocrite, this is the wonder of baking. Embrace the quirks, laugh at the mistakes, and enjoy every bite. Oh, and don’t forget: I am not an expert, just a self-taught baker. What works in my kitchen might not succeed in yours, but hopefully some of this will resonate with (and help) you.
Lean vs enriched doughs: an introduction
When it comes to bread, not all doughs are created equal. One of the most fundamental distinctions in baking is between lean doughs and enriched doughs. Understanding this difference helps you anticipate texture, flavor, and the types of breads you can create.
The term “enriched” comes from the added ingredients, particularly fats, dairy, and sugar, that enrich the dough beyond the basic lean formula. These enrichments do more than just flavor the bread: they soften the crumb, extend freshness, and create a more luxurious eating experience.
The practice of enriching bread is centuries old. In Europe, for example, breads with eggs, milk, and butter were traditionally reserved for special occasions, holidays, and the wealthier classes. While lean breads were everyday staples for most people. For example:
- Brioche: Thought to have originated in Normandy, France, brioche is an egg and butter-rich bread that was considered a luxury.
- Challah: Enriched with eggs and often sweetened, challah is typically baked for the Sabbath and festivals.
- Panettone: A tall, sweet, enriched bread with eggs, butter, and sugar, eaten around Christmas.
Enriched breads became more widespread as sugar, butter, and eggs became more available to the general population. They evolved from “celebration breads” into everyday favorites in many cultures, giving home bakers the opportunity to enjoy soft, tender, and flavorful loaves.
In contrast, lean doughs, made simply with flour, water, yeast, and salt, remained the backbone of everyday bread-making, prized for their simplicity, long fermentation, and rustic flavor.

Lean vs enriched doughs: side-by-side comparison
Lean doughs are the simplest form of bread dough. Because they lack added fats, sugar, or dairy, lean doughs produce breads with a chewy texture, a crisp crust, and a more straightforward, slightly tangy flavor. Lean doughs rely entirely on the fermentation of the flour and yeast for flavor and structure.
Enriched doughs contain additional ingredients that boost flavor, color, and tenderness. These ingredients interact with the gluten and starch in the flour to produce softer, richer, and more tender breads with a slightly sweet, buttery flavour.
Here’s a simple side-by-side comparison:
| Feature | Lean Dough | Enriched Dough |
|---|---|---|
| Key ingredients | Flour, water, yeast, and salt only | Can include: flour, water, yeast, salt plus fats (butter or oil), dairy (milk, sour cream, gräddfil), eggs, sugar, or honey |
| Texture | Mostly chewy and rustic with a crisp crust; pan loaves slightly softer | Soft, tender, sometimes fluffy |
| Crust | Crisp on all, more pronounced on free-form loaves | Softer, golden, sometimes glossy |
| Examples | Baguette, lean sandwich bread, rustic round loaf, ciabatta, batard | Brioche, challah, cinnamon rolls, panettone, hot cross buns, soft sandwich loaves, milk bread |
Enriched dough: the diva that can’t be rushed
Enriched dough is a bit of a diva compared to lean dough. It doesn’t just rise; it expects to be treated properly. Rush it, handle it roughly, or try to force it into shape, and it may protest with uneven rises or cracks. Think of it as a high-maintenance guest at a dinner party: a little temperamental and fussy, but with the right attention, it behaves beautifully and impresses everyone at the table.
If enriched wheat dough is a diva, enriched spelt dough is the prima donna. It has all the same needs as enriched dough in general, but far less tolerance. Spelt’s gluten is weaker and less elastic than modern wheat, so the dough reaches its limits sooner and responds more dramatically to small changes. In other words, spelt doesn’t introduce new problems. It amplifies the ones you already know.
Because fats and sugars slow fermentation, enriched dough usually needs more time to proof than lean dough. Its gluten structure is also more tender, which means heavy hands or too much added flour can quickly turn something soft into something dense. Minor imperfections are normal and don’t affect flavour; they’re simply part of working with a richer dough.
Discover the enriched dough’s rhythms, handle it gently, and accept that it won’t behave quite like a lean loaf. Once you learn to read its signals, its quirks feel less like misbehaviour and more like part of its charm.
Why flour ranges matter
You may notice that my spelt bread recipes list flour as a range rather than a single fixed amount. I tend to stick to a base recipe for my enriched bread, stating 360–480g (3–4 cups) of flour. This range is intentional and used for a number of reasons.
The lower figure is a starting point, designed to prevent adding too much flour too early. Spelt dough can easily become dense or dry if over-floured, so beginning conservatively gives the dough room to develop properly.
Spelt flour behaves differently from modern wheat. Its gluten is more extensible and less elastic, which affects how the dough absorbs liquid and develops structure. Environmental factors such as humidity, temperature, and even seasonal changes can also influence how the dough behaves. Enriched doughs introduce further variability, with ingredients like milk, yoghurt, gräddfil, sour cream, butter, eggs, or cream contributing additional liquid and fat.
The upper figure in the range reflects what most bakers will need to use under typical conditions, but it is not a hard limit. Depending on your flour, ingredients, and kitchen environment, you may end up needing slightly more than the listed range, and that is completely normal.
In my experience, spelt dough can appear very sticky one minute and reach the right consistency shortly after. Often a lot faster than you might expect. This is why I recommend adding flour gradually and paying attention to how the dough feels, rather than relying on a fixed number. Keep in mind that every batch is slightly different, so your results may vary.
Mixing the spelt dough ingredients
The preparation of the dough is crucial for enriched spelt breads. It most certainly is not a quick procedure.
I follow the same order for most of my enriched doughs. To start off, I warm up the milk in a microwave safe jug before adding the butter. I cut it into slithers which means that it softens in the warm milk really nicely. I next add whatever additional dairy I am using, such as eggs, yoghurt, gräddfil, sour cream and sometimes cream cheese. Lastly, I mix in the sugar (or honey) and yeast.
I pour this into my stand mixer, and give the ingredients a quick mix (a little longer if there is an egg). Then, I add about two thirds of the flour I am expecting to use. So, in my base enriched dough recipe, I add only 360g (3 cups) of flour in with the wet ingredients to start off with. I mix the ingredients for a minute before adding more flour.
I continue to add more flour gradually, one tablespoon at a time, pausing between additions to let the dough absorb it. It can go from sticky to ready in seconds; something I’ve seen happen many times. You may not need all of the flour stated, or, you might need a little more. That’s completely normal.
Understanding when the dough is ready
For me, this is what took the longest to figure out. Don’t be alarmed that the dough is very sticky at first; this is right where it wants to be. In the early days, I often found myself panicking a little and adding way more than was necessary.
As you add more flour, you should notice clear signs that it’s coming together correctly. The mixer may begin to work a little harder (I can actually hear mine shift up a gear). The dough will also start to pull away from the sides of the bowl. At this stage, it will slip off the paddle when lifted.
Continue to add a touch more flour every now and again while working the dough. After a while, I begin to see what I call the tornado. This is where the dough begins to swirl around the paddle, lifting and spinning in a vortex. This indicates that the gluten is developing and the dough is becoming cohesive; a reassuring sign that it’s on the right track. Soon, all of the dough will have lifted cleanly from the sides and most of the bottom. It will no longer slip from the paddle, but it will easily pull off when helped with your hands. Here’s what it looks like at that point:
The dough should feel tacky but not sticky. It is soft, but it won’t cling to your fingers. This is a subtle but important distinction. Dough that sticks heavily to your hands usually needs a little more flour, while dough that feels dry or stiff has likely had too much flour added.
After all this mixing and careful flour incorporation, the dough is already well-kneaded. There’s no need for further kneading. I just use a spatula to gather the dough together, then simply cover the bowl ready for its first proofing.
Watching how the dough behaves in the mixer, and noticing changes in its texture, elasticity, and its formation, is an essential skill in working with spelt. As mentioned, every batch can behave slightly differently depending on flour, temperature, and humidity. Learning these cues will help you gauge when your dough is ready for shaping and proofing, and make the whole process less intimidating.
Proofing enriched spelt dough
Proofing is one of the most important steps when working with enriched spelt dough, and like the mixing stage, it requires patience. I’ve found that enriched doughs, as well as wholegrain doughs, benefit from longer, slower proofs, while lean spelt dough rises surprisingly quickly. Think of it as a slow burner, and don’t panic if progress seems slow.
This difference comes down to the properties of spelt flour. Lean spelt dough is lighter, more hydrated, and has a weak but extensible gluten structure, which allows gas from fermentation to expand the dough rapidly. There are no fats, sugar, or eggs to slow down yeast activity, so the dough rises efficiently. Enriched dough, by contrast, requires longer proofs for proper structure and a soft, even loaf.
Allow enriched spelt dough to rise fully in the bowl for around 60–90 minutes, or until it has roughly doubled in size. This initial, fairly long, rise gives the gluten a chance to develop and the dough time to become cohesive.
The second proofing
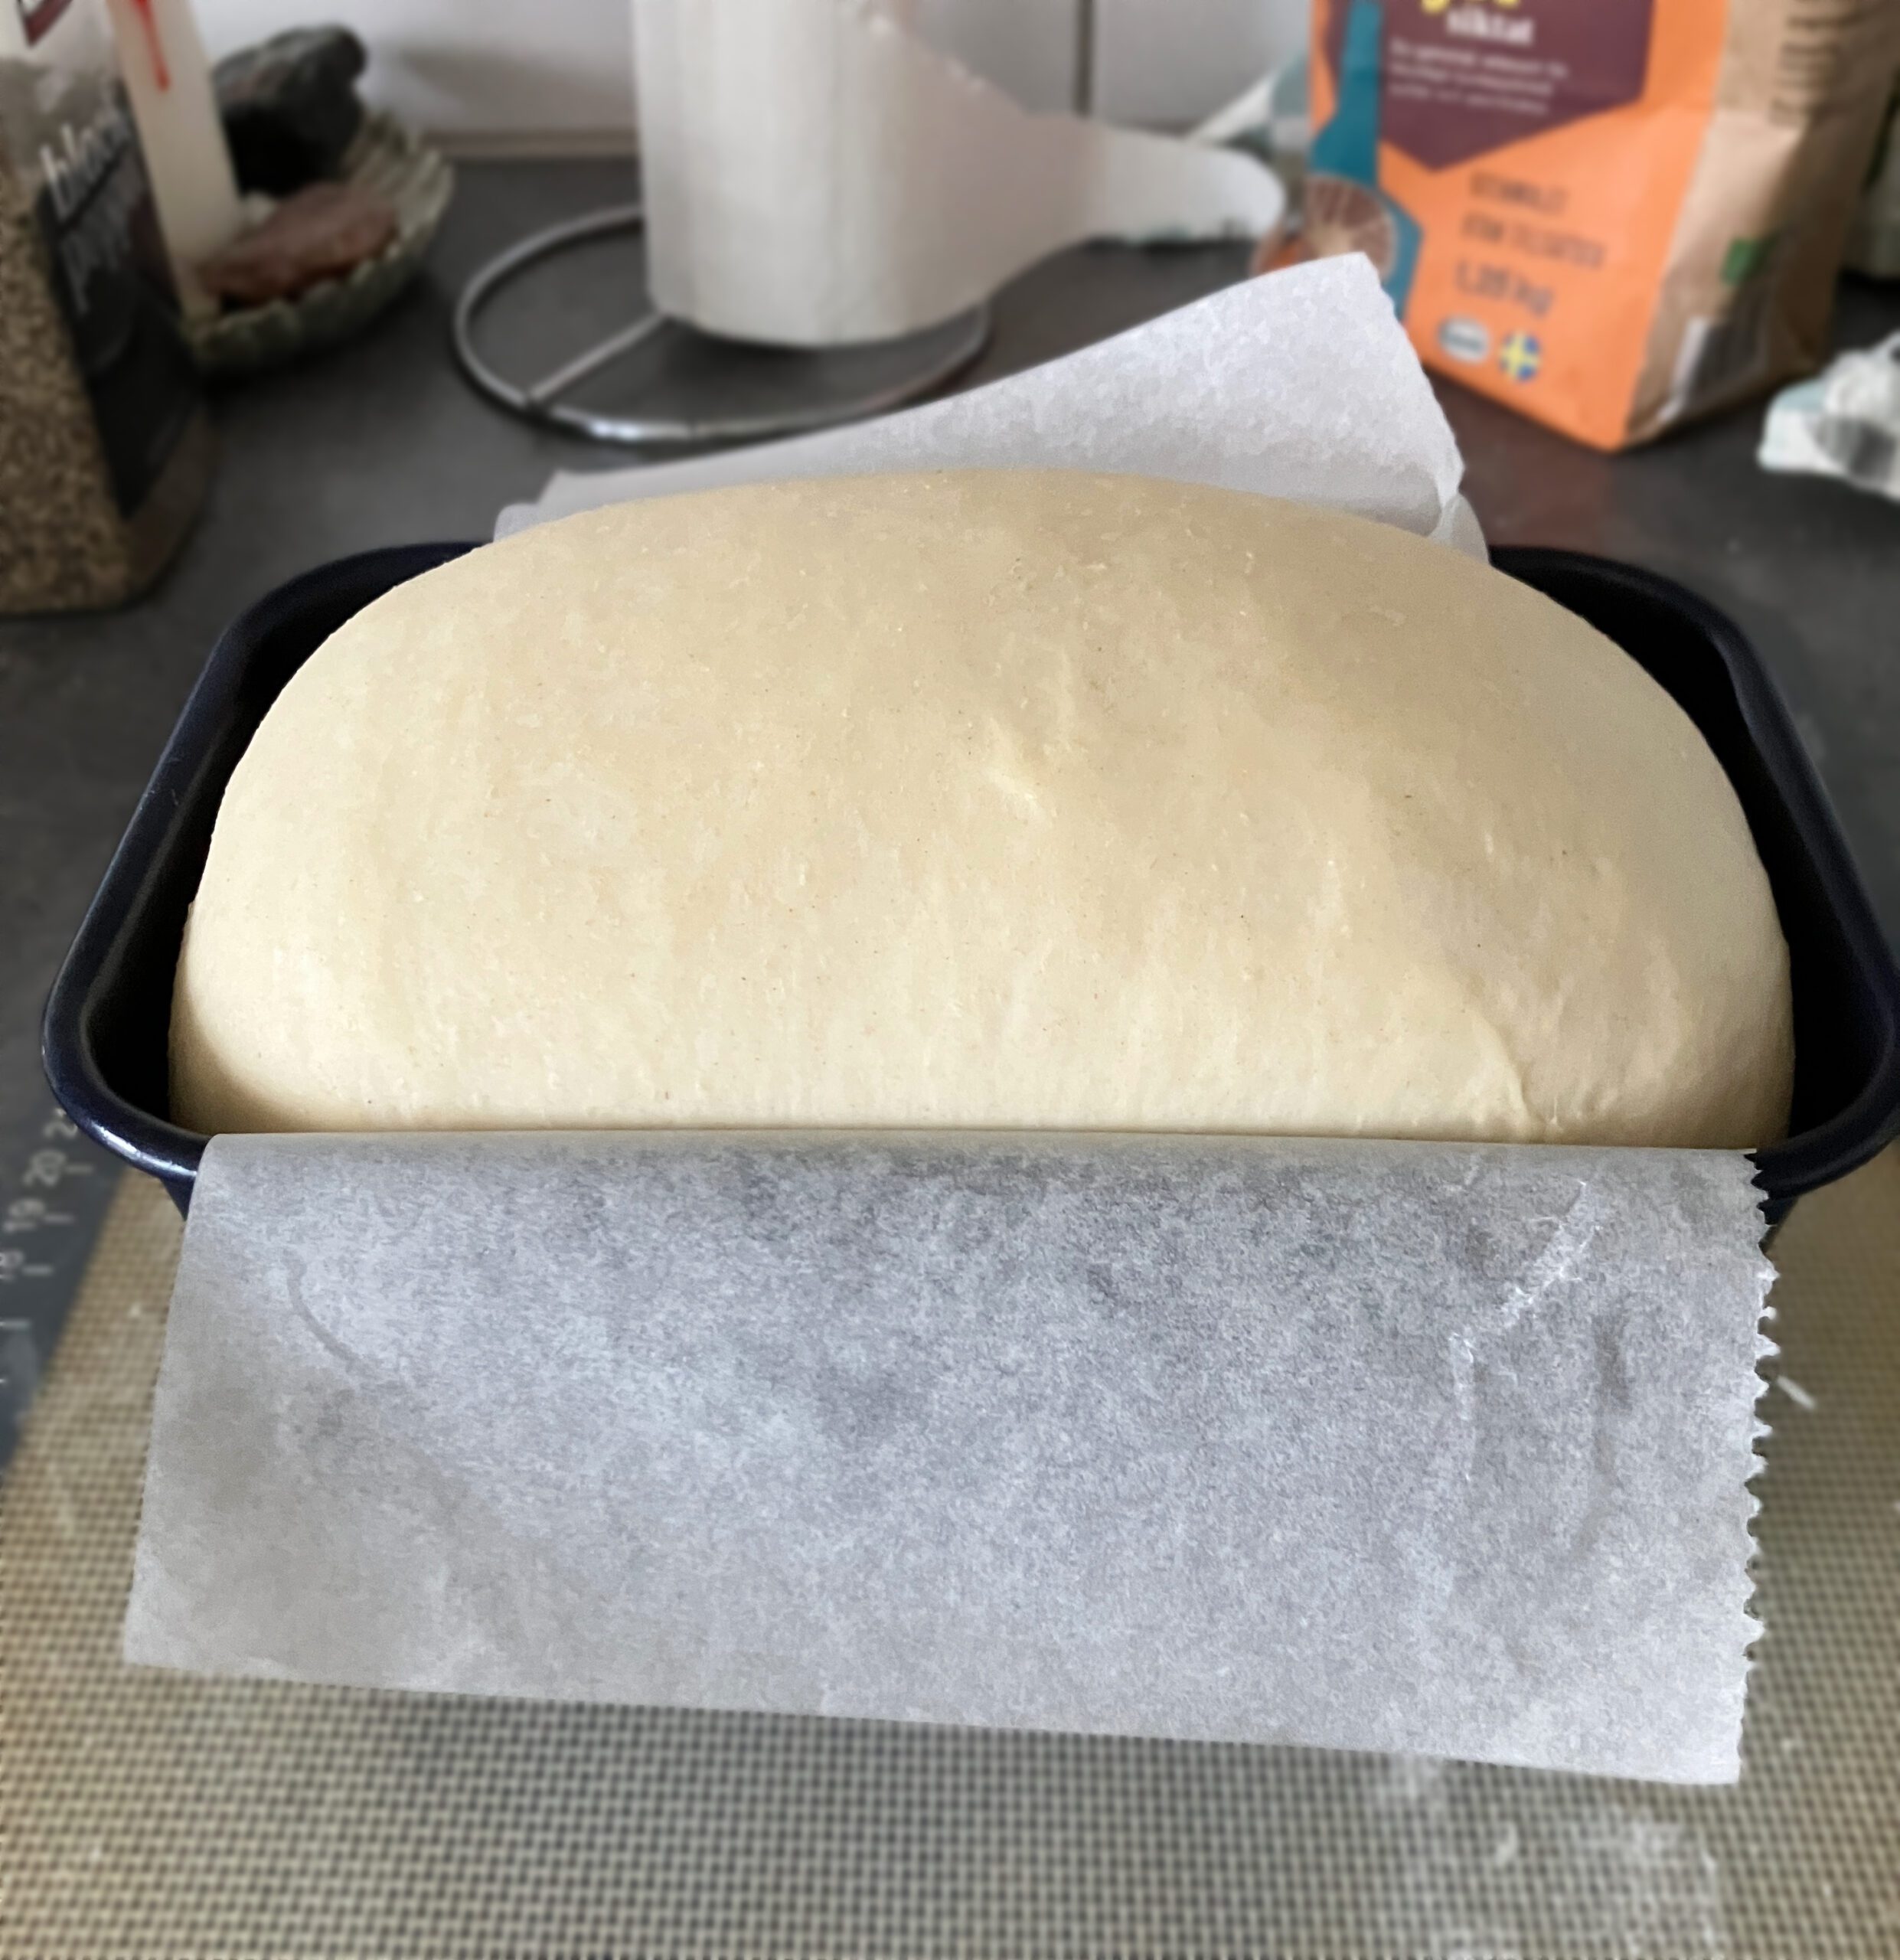
After shaping (which we will be discussing in the next section), place the dough in your loaf tin, cover, and let it proof for around 60 minutes, or until it reaches the top of the tin (or just a little higher). Some bakers may worry about letting it rise this much, but in my experience, enriched spelt dough handles it well.
This second proof allows the gluten to relax and the loaf to expand more evenly in the oven. This will help reduce (but never entirely eliminate) the likelihood of dramatic splits while still achieving a beautiful rise. While some unevenness is normal, excessive lopsidedness can be caused by insufficient proofing. If the dough hasn’t fully risen, the gluten is tighter, and once it hits the oven, rapid gas expansion can exaggerate weak spots, causing an uneven loaf.
The fats, eggs, and sugar give the dough a bit of extra strength, and a long first rise helps it stay steady and elastic. It’s important to consider that there is no “one size fits all” approach or advice when it comes to proofing. Flour, temperature, humidity, and the richness of your dough all affect timing. I usually know it’s ready when it has doubled in size and holds its shape. Again, for this second proofing, watching the dough, rather than the clock, is key. Sometimes it needs a little more time, sometimes a little less. With experience, you’ll start to notice when your enriched spelt dough is fully proofed, and how much more controlled its behaviour is when in the oven.
Shaping enriched spelt dough
If you’ve followed the pointers above, you should need very little additional flour, if any. Proofing firms up the dough because the gluten has developed, and the dough has absorbed liquid. This gives it more structure. At this stage, you should be able to scoop the dough out of the bowl onto the surface without it sticking to your hands. I use a silicone mat, which helps prevent sticking and means you need even less flour.
Avoid adding too much extra flour or working on a heavily floured surface. This can dry out the dough and make the crumb dense. Instead, add flour sparingly, just enough to prevent sticking, and rely on the dough’s natural texture to guide you. The dough should be soft, very workable, and easy to shape.
That said, spelt enriched dough can feel like it has a mind of its own. It might resist when you stretch or shape it, then bounce back unexpectedly. Like a friendly, little tug-of-war between you and the dough. This is perfectly normal, a result of spelt’s delicate gluten combined with the richness of an enriched dough. However, if it feels stiff or not pliable, it’s likely that too much flour was added during the mixing stage.
Even for breads that don’t contain a filling, I still like to roll the dough out. This helps redistribute the larger bubbles that have formed during proofing. Smaller bubbles are desirable because they create a light, open crumb, and give the bread a tender texture. Larger bubbles can be a little more problematic, and can lead to uneven or lopsided loaves, so we want to try to reduce those.
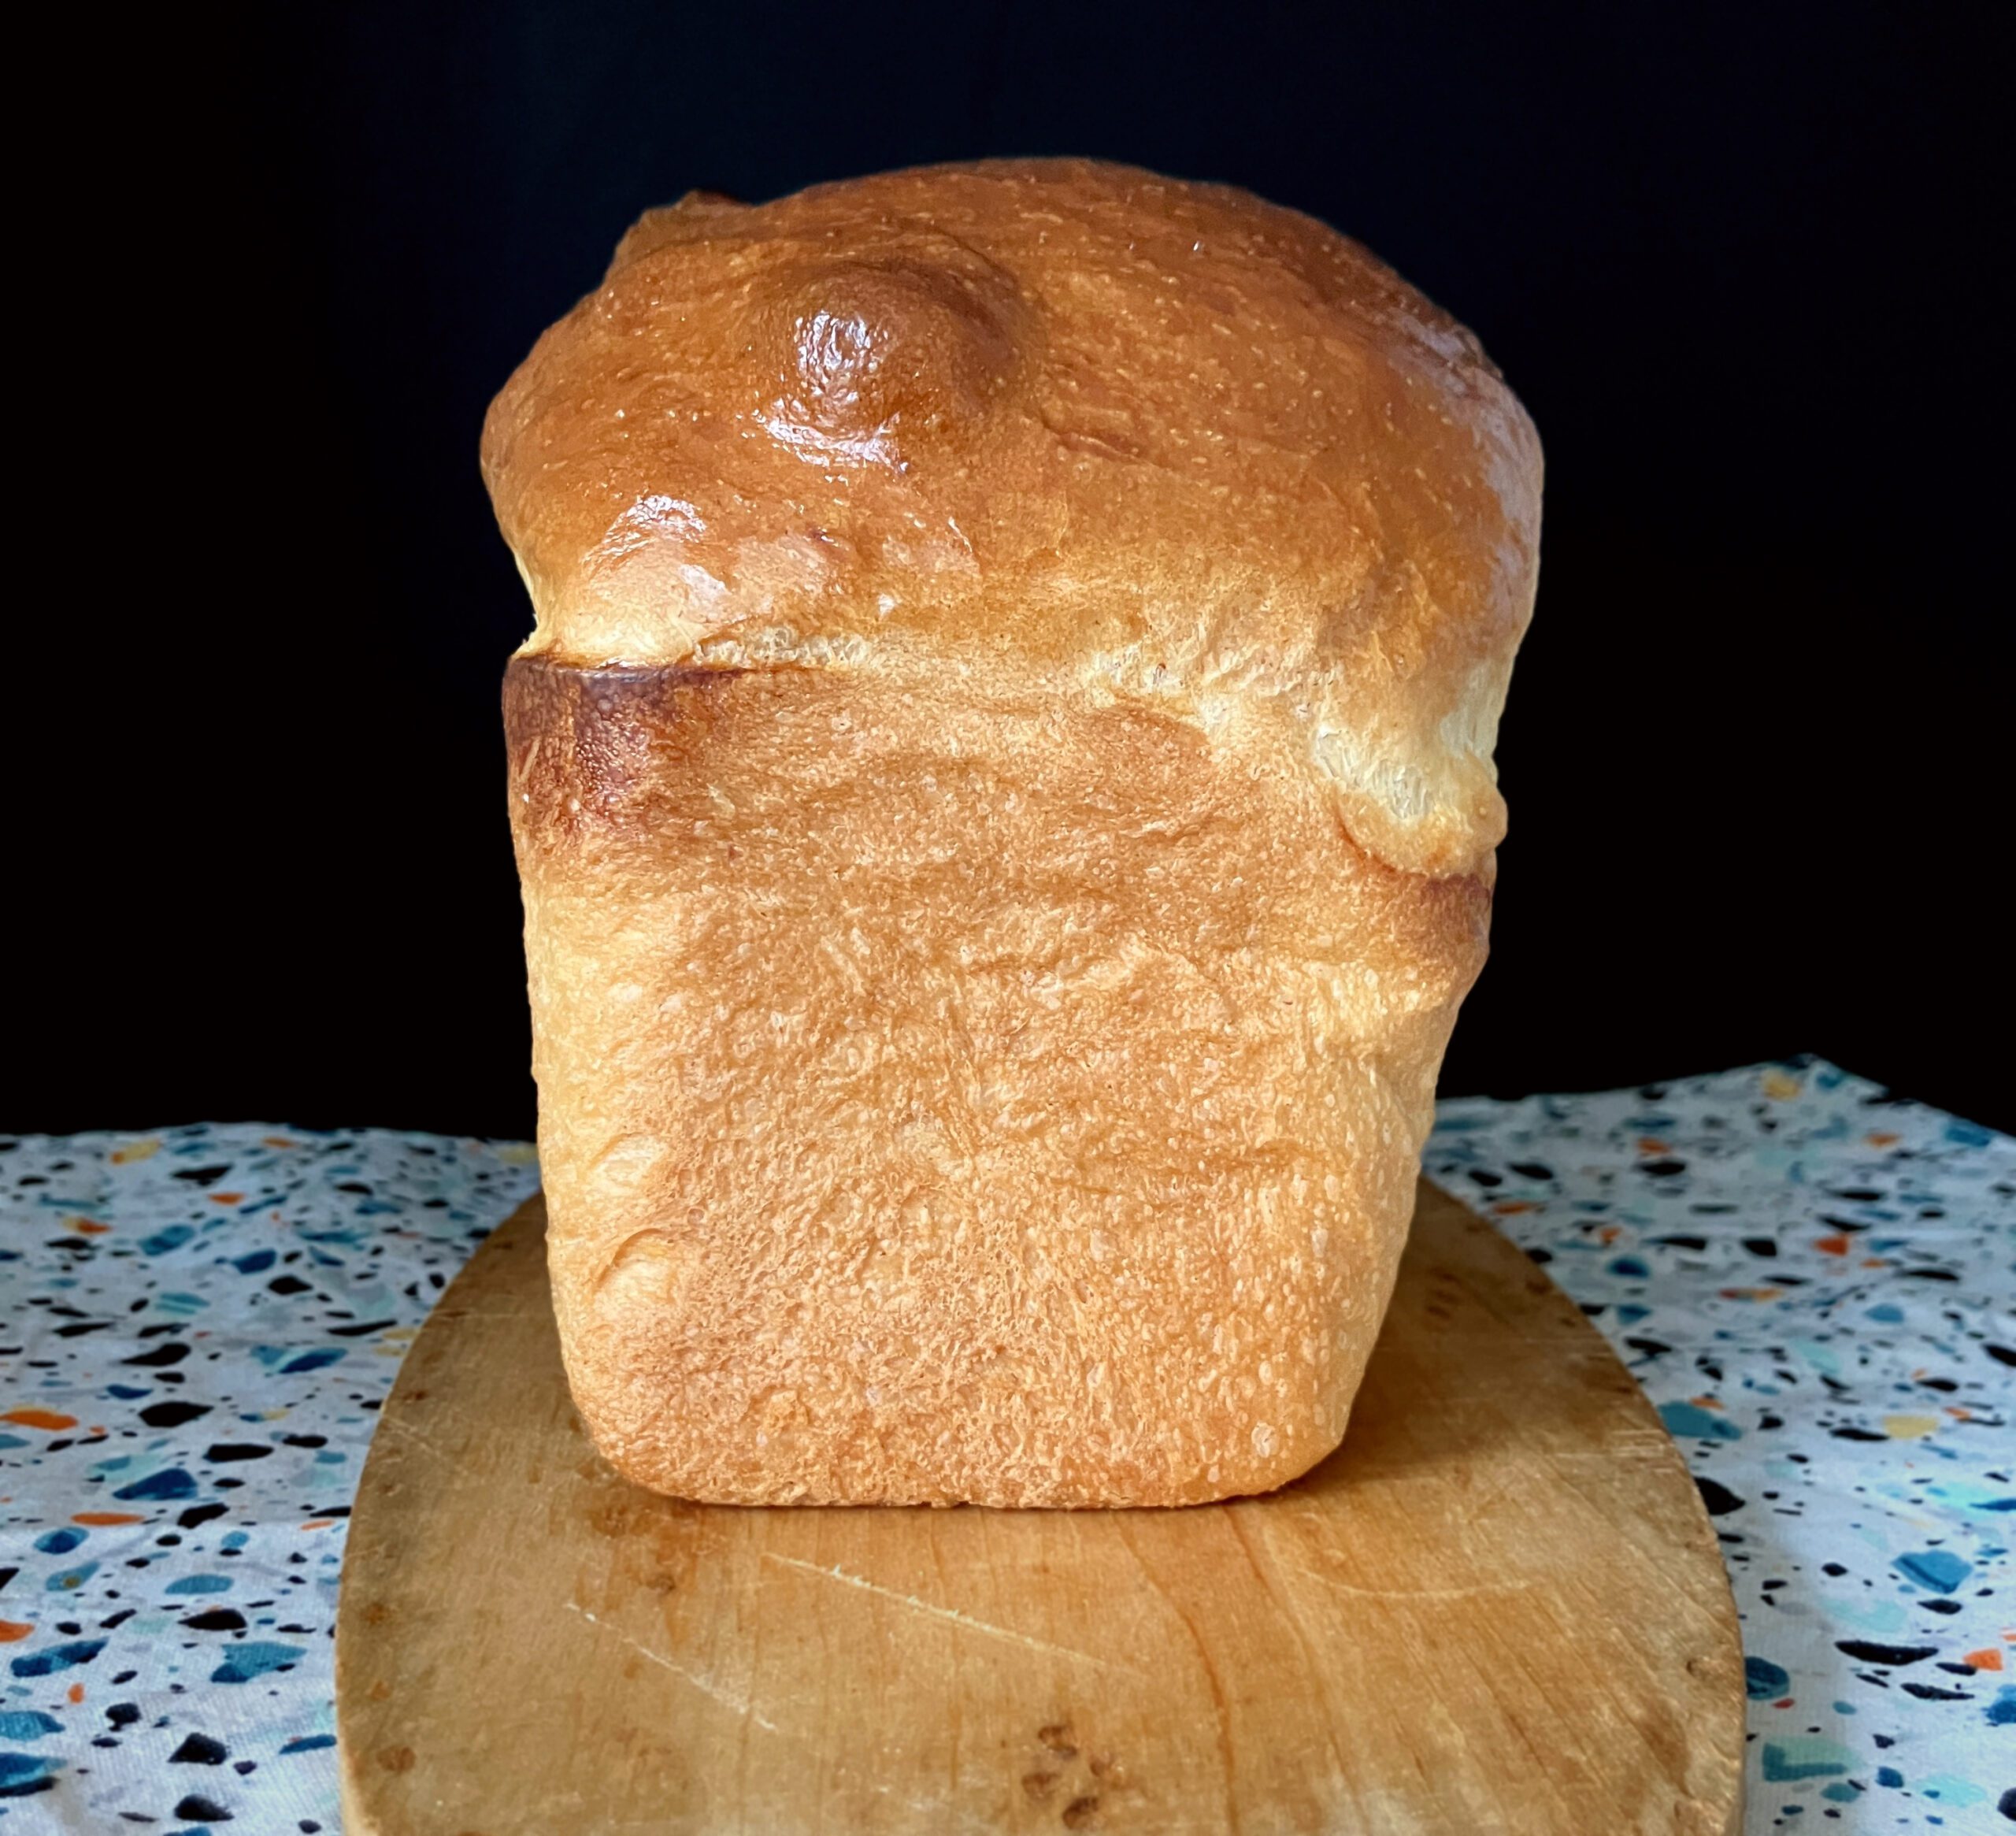
For the loaf below, I didn’t roll it out, but pressed it with my fingers to shape to release the air bubbles. Obviously not all of them, though. You can clearly see the very large bubble that has risen to the surface. Bless him, he looks like he has some contagious disease. He’s a little lopsided too. It doesn’t matter, but it does show that we can’t completely eliminate “imperfections” even if we want to.
After rolling out, I typically shape the dough into a rectangle and roll it back up, just as if I was making a cinnamon swirl loaf. I also pinch the edges as I would with a filled bread. When lifting the dough, I tuck the bottoms under and stretch the top slightly to create some surface tension.
I then place the dough carefully in the pan, making sure it isn’t squashed. During baking, the dough will spring upward rapidly, and if it’s too tight, it may burst. Giving it space allows it to rise evenly and develop a beautiful shape.
Baking enriched spelt loaves
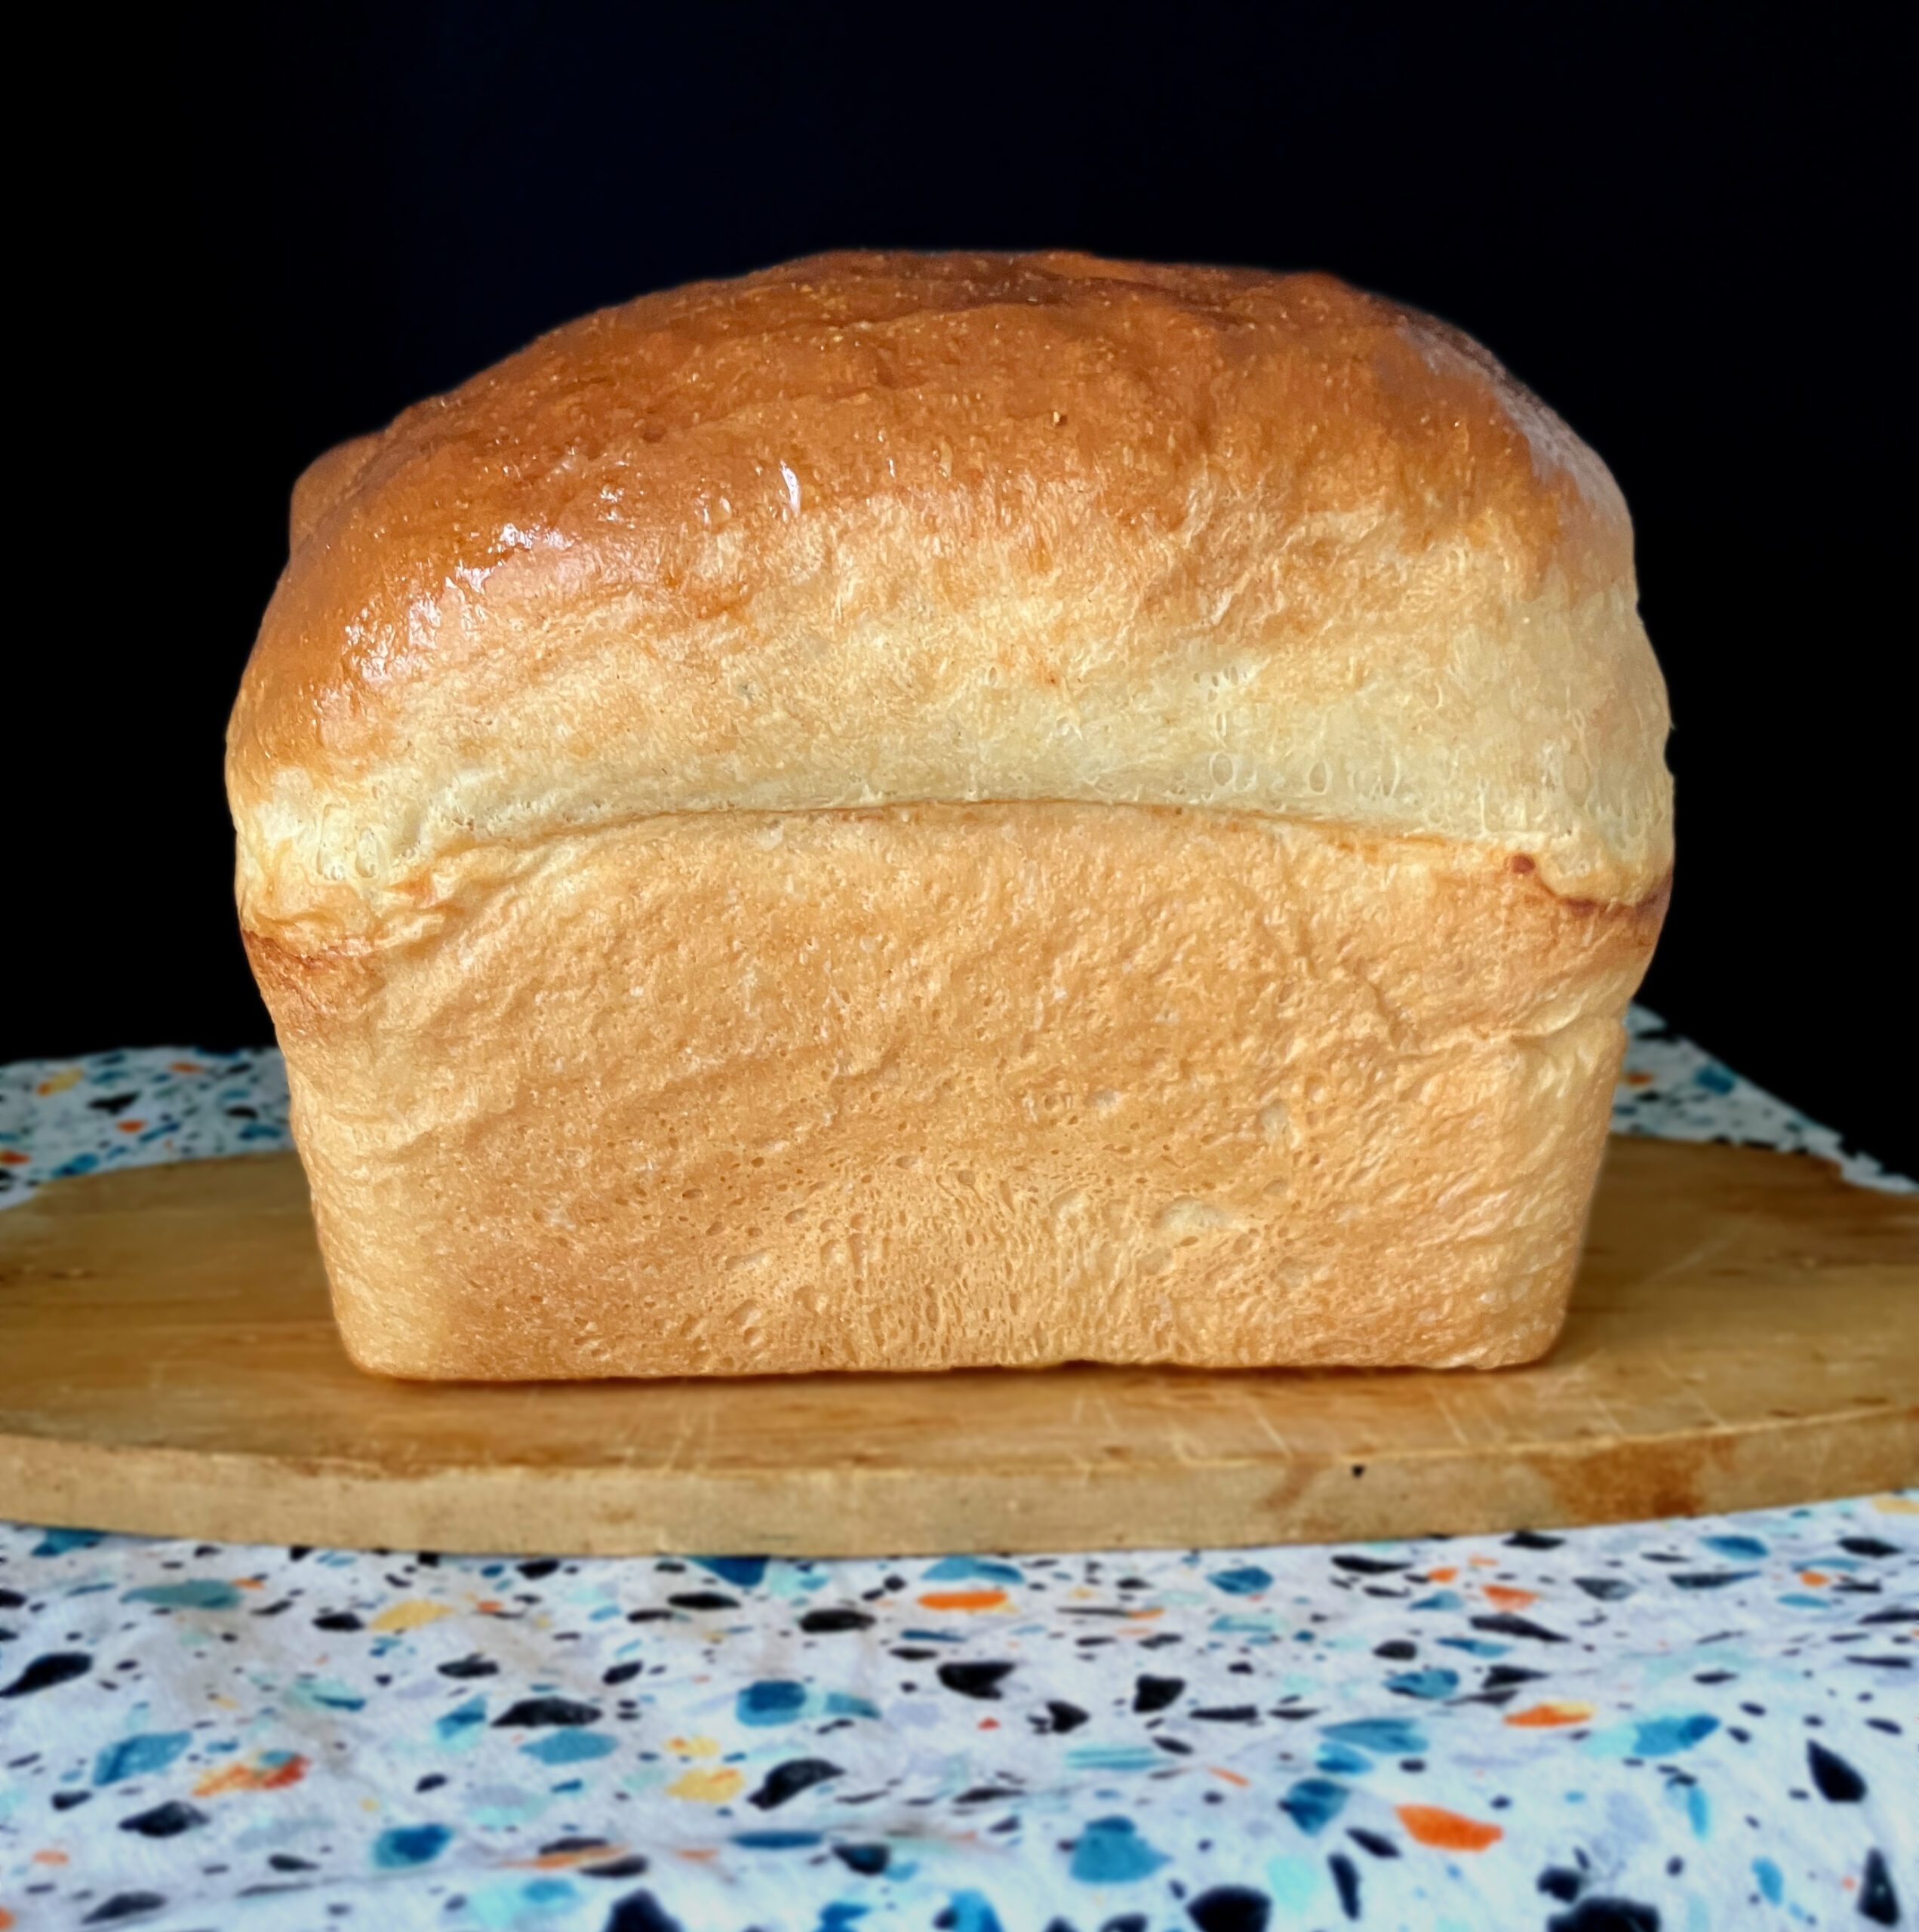
I like to use tall loaf tins for enriched breads. Not only do they create a taller, more elegant loaf, but they also offer extra support for the soft, tender dough. I bake my loaves at a moderate 180°C (350°F) and place the pan in the lower part of the oven. This gentler positioning helps prevent lopsidedness or bursting, giving the dough a steadier oven spring.
I always grease my pan liberally with soft butter. Then, I trim my baking paper so it fits the bottom of the tin but stops short of the two short sides, with a bit of overhang on the long edges. Those flaps make it easy to lift the loaf out and check if it’s baked through.
Brushing enriched bread with an egg before baking is optional, and I don’t always bother. It gives a shiny, golden top and somewhat softens the crust slightly, but it isn’t necessary for flavor or structure.
Enriched breads, especially those with a lot of sugar or fat, brown quickly, and ovens often have hot spots, which can cause one side to rise or brown faster than the other. Start watching the loaf closely from around 10 minutes in, and this is a good time to rotate the pan for a more even bake. About halfway through, I usually cover the loaf with a tinfoil tent to prevent over-browning while allowing the inside to continue cooking.
Small loaves will typically bake in around 25–30 minutes, but baking times can vary depending on the size of the loaf, the type of pan, and the exact recipe, so always keep an eye on your bread.
Post baking enriched spelt bread
Sometimes it can be tricky to tell exactly when an enriched spelt loaf is done. A few signs that your loaf is ready:
- The top will be golden brown and feel firm to the touch.
- The loaf should sound hollow if you gently tap the bottom.
- The sides may pull slightly away from the pan.
Some bakers like to check doneness with an internal thermometer. Enriched loaves bake at a slightly lower temperature than lean breads, around 88–91°C (190–195°F), because the fats and sugar tenderise the crumb. I don’t use a thermometer very often, but it’s a helpful tool if you want extra confidence that the loaf is fully set before cooling.
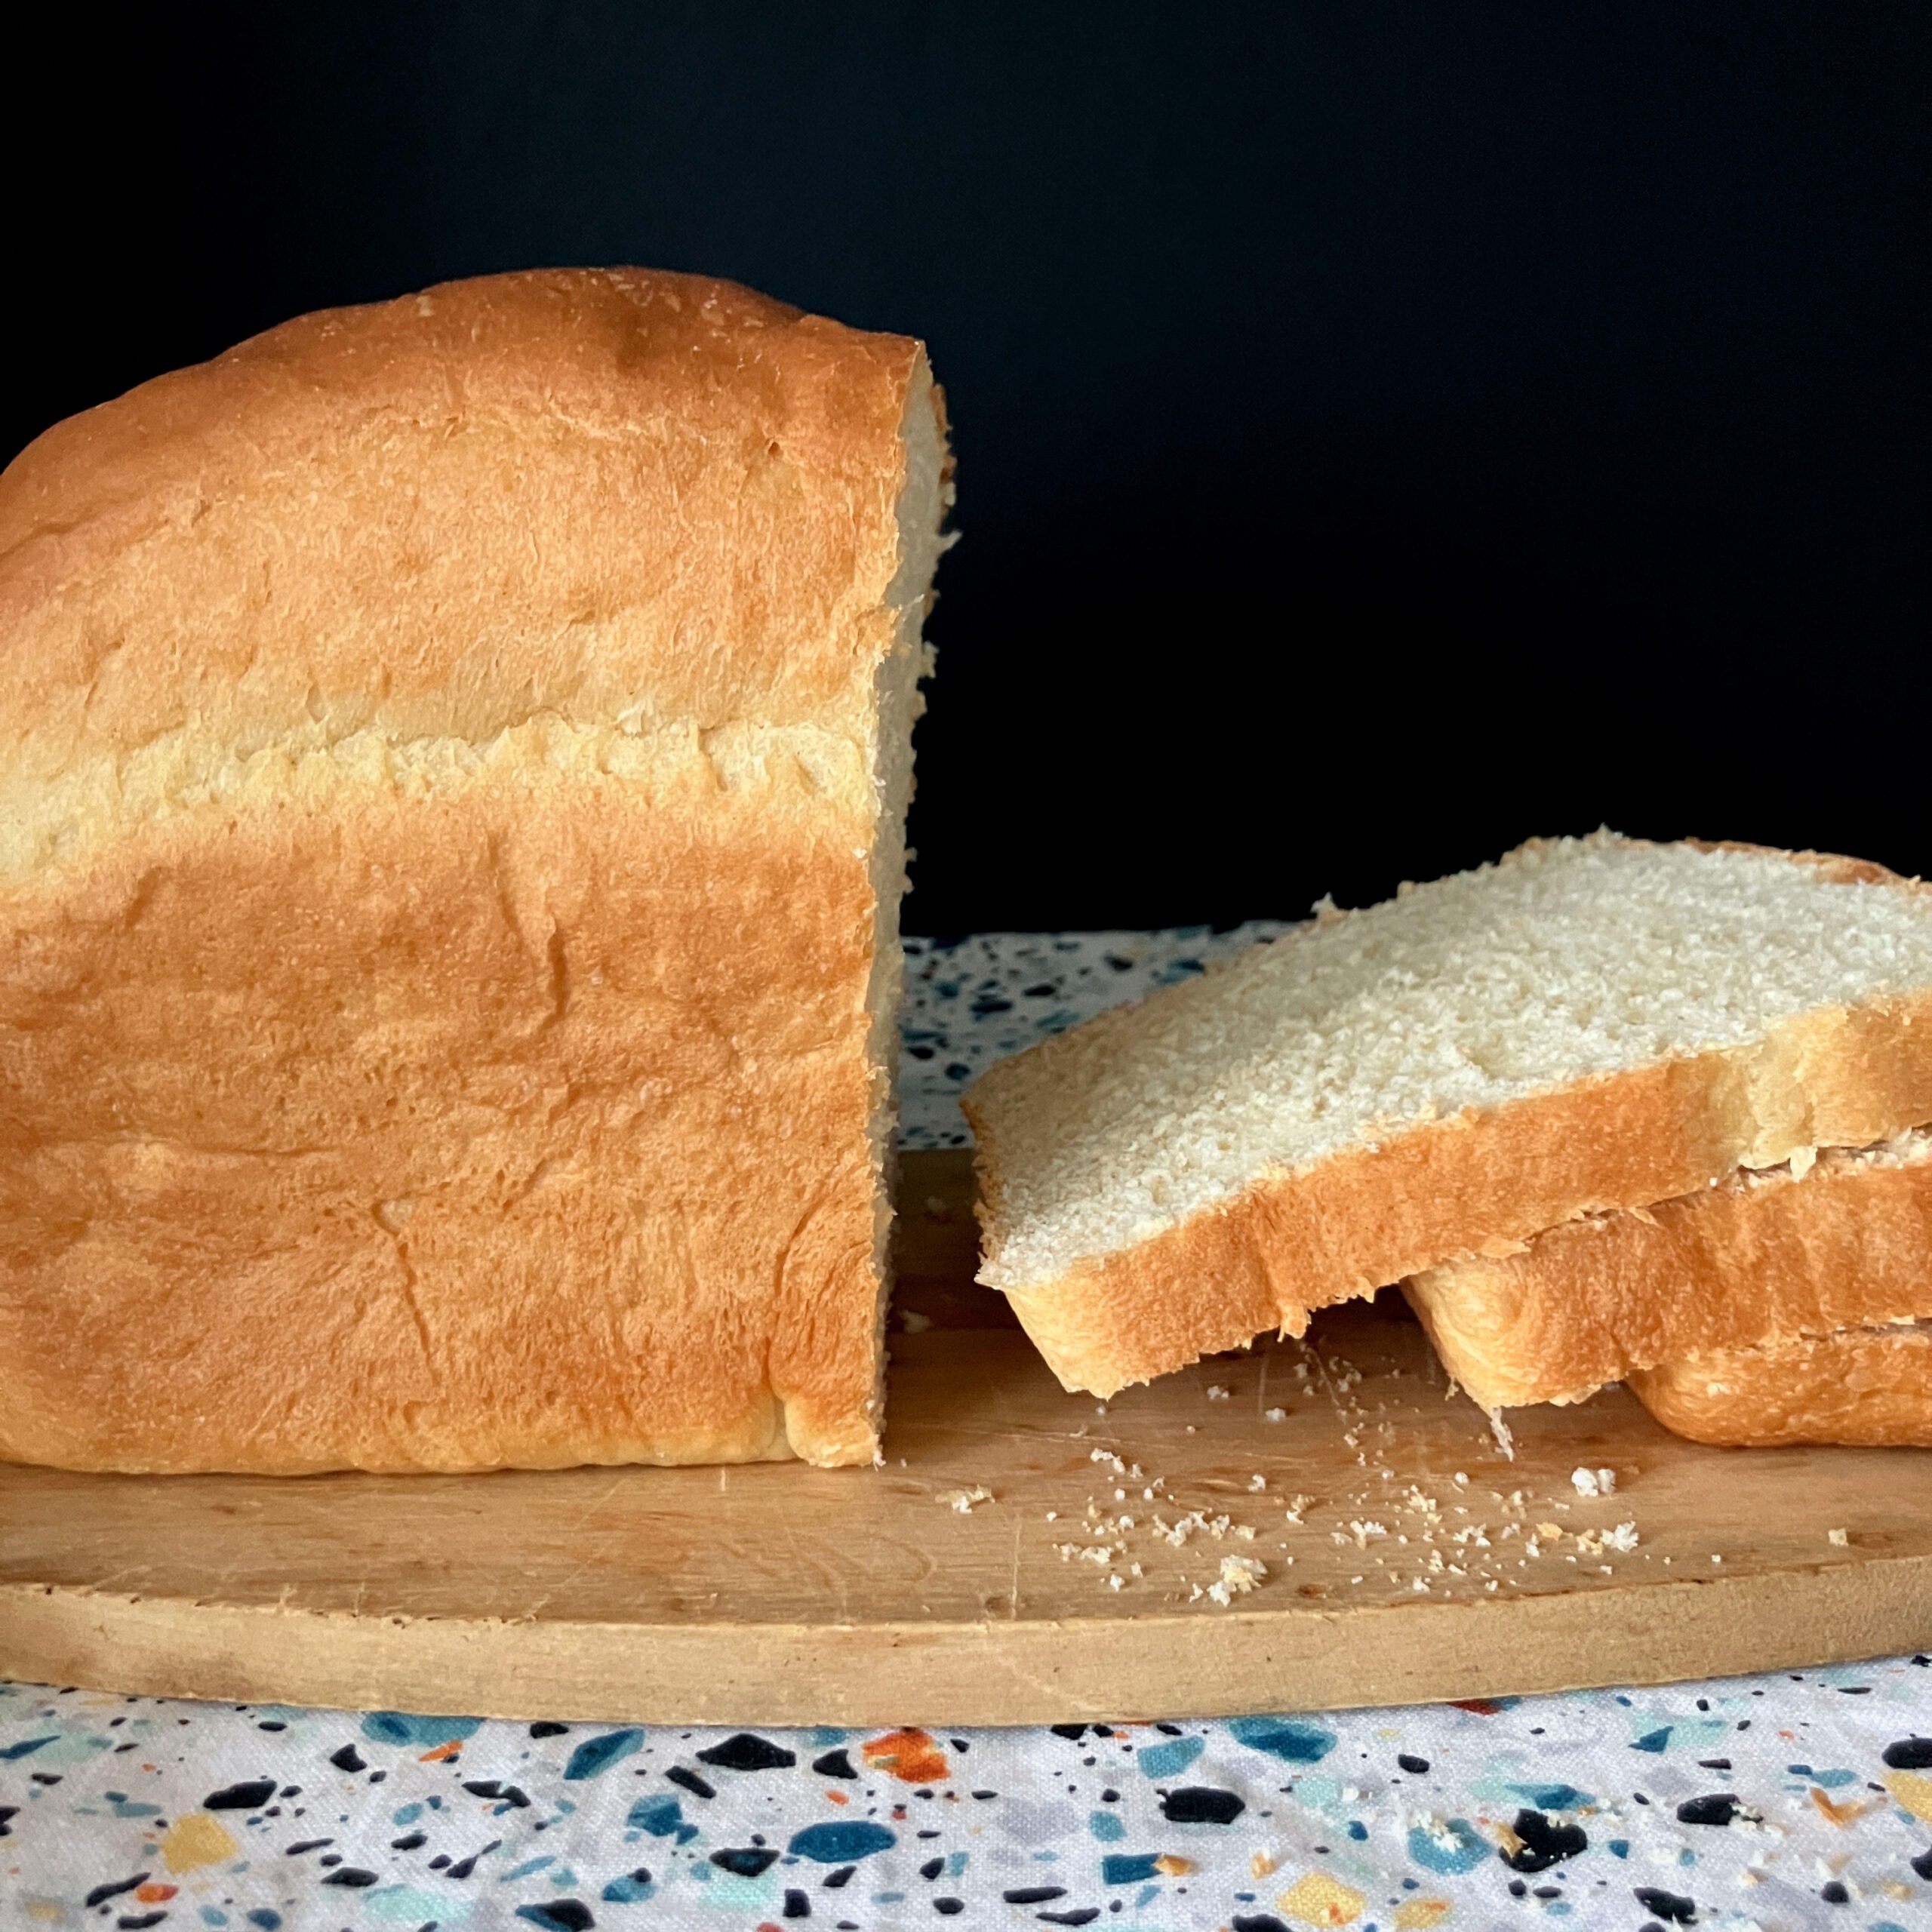
Once baked, allow the loaf to cool completely before slicing. As tough as it is, because what’s better than warm bread with lashings of butter?, this step is crucial. The crumb continues to set as it cools, and cutting too soon can cause the bread to collapse or feel gummy inside. Full cooling ensures a stable structure, a tender crumb, and the best texture for enjoying your enriched spelt loaf.
Spelt bread can dry out quite quickly, so I always slice up my loaf and freeze immediately. I then take it out as needed. It always tastes and feels just as delicious as the moment it came out of the oven, and is perfect toasted.
Troubleshooting issues with enriched spelt dough
1. Dough too wet at shaping
If your dough feels sticky and hard to handle at the shaping stage, it usually means there isn’t quite enough flour in the dough. Don’t panic!
Suggestions: Add flour gradually until the dough is workable. Try to avoid tipping large amounts of flour onto a heavily floured surface, as this can dry out the dough and affect the final crumb.
2. Dough too dry or stiff
If the dough feels stiff or not pliable at the shaping stage, it usually means too much flour was added during mixing. While it’s difficult to fully reverse, you still might be able to salvage it.
Suggestions: Lightly wet your hands and shape it as best you can. It may be denser than intended, but the loaf will still taste delicious.
3. Lopsided rise or uneven oven spring
Some unevenness is to be expected, but excessive lopsidedness can come from insufficient proofing (which causes sudden oven spring), uneven shaping, or hot spots in the oven.
Suggestions: Allow the dough to proof fully before baking, then bake the loaf on the lower part of the oven and give it plenty of space to expand. This helps encourage a more even rise.
4. Burst crusts or dramatic splits
Rapid oven spring, large air pockets, or overly tight shaping can cause the dough to blow out in unexpected places. Minor cracks are normal and part of the charm of spelt bread.
Suggestions: Build gentle surface tension during shaping, make sure both proofs are long enough, and bake the loaf on the lower part of the oven. Handling the dough with care helps reduce the chance of blow outs.
5. Dense or heavy crumb
Too much flour or underproofing can make the loaf dense.
Suggestions: Make sure both proofs allow the dough to rise fully, and add flour gradually during mixing or kneading. This helps keep the crumb light and soft.
6. Crumbly or brittle crumb
A crumbly loaf usually happens when the dough rises too quickly or the gluten is weak. Rapid fermentation can outpace the dough’s structure, leaving a fragile crumb.
Suggestions: Slow the fermentation slightly by reducing yeast or proofing at a cooler temperature, and make sure the dough is well developed during the first rise to build enough structure.
7. Gummy crumb
If the crumb feels wet or sticky after cooling, the loaf was likely underbaked or sliced too soon.
Suggestions: Make sure the bread is fully baked and cooled completely before cutting.
8. Large bubbles or uneven crumb
Spelt dough naturally develops many bubbles. Small bubbles are desirable for a light, open crumb, but large ones can create uneven loaves.
Suggestions: Gently rolling the dough after the first proof helps redistribute larger bubbles and improves the final shape.
9. Pale or soft crust
If the crust doesn’t brown enough, it may be due to oven temperature, placement, or excess moisture in the dough.
Suggestions: Using the lower part of the oven provides gentler, steadier heat, and removing a tinfoil tent near the end of baking can help achieve a golden finish.
More spelt flour tutorials and tips
So, that’s it! Hopefully some of this info actually helps. Follow the steps, and you’ll end up with the softest, most stable bread that slices like a dream. Sure, sometimes your loaf might look a bit like it had a rough night, but trust me, nobody’s going to care. They’re way too busy eating it.
If you enjoyed this post, check out some of my other tips and tutorials:
Covering everything you need to know to get started with spelt flour, from tips to recipes.
In this post, I guide you through the process of making a simple loaf of bread. This includes common pitfalls to avoid when using a bread machine.
This time, I focus on using a bread machine to make wholegrain spelt bread. Specifically exploring which cycle is best for this type of flour.
This tutorial settles the debate on whether spelt flour can perform as well as regular white flour. Check out my results, which may not be as surprising as you think.
Spelt flour makes amazing scones, fact. While the process is fairly simple, there are a few key things to watch out for to ensure perfect results.