
Ultimate Chocolate Overload Birthday Cake with Nutella Frosting
This chocolate overload cake might look like a showstopper, but it wasn’t without its challenges. And when it comes to birthday cakes, the pressure is real, especially when baking for someone you love.
From last-minute recipe hunts to frosting mishaps, join me as I share the story behind this rich, indulgent cake that stole the show (and my heart) on my son’s 12th birthday. If you’re a chocolate lover, get ready for a treat.

This recipe for chocolate overload cake was first published on The Culinary Jumble in November, 2016. The recipe and blog post have been amended, but the images remain the same.
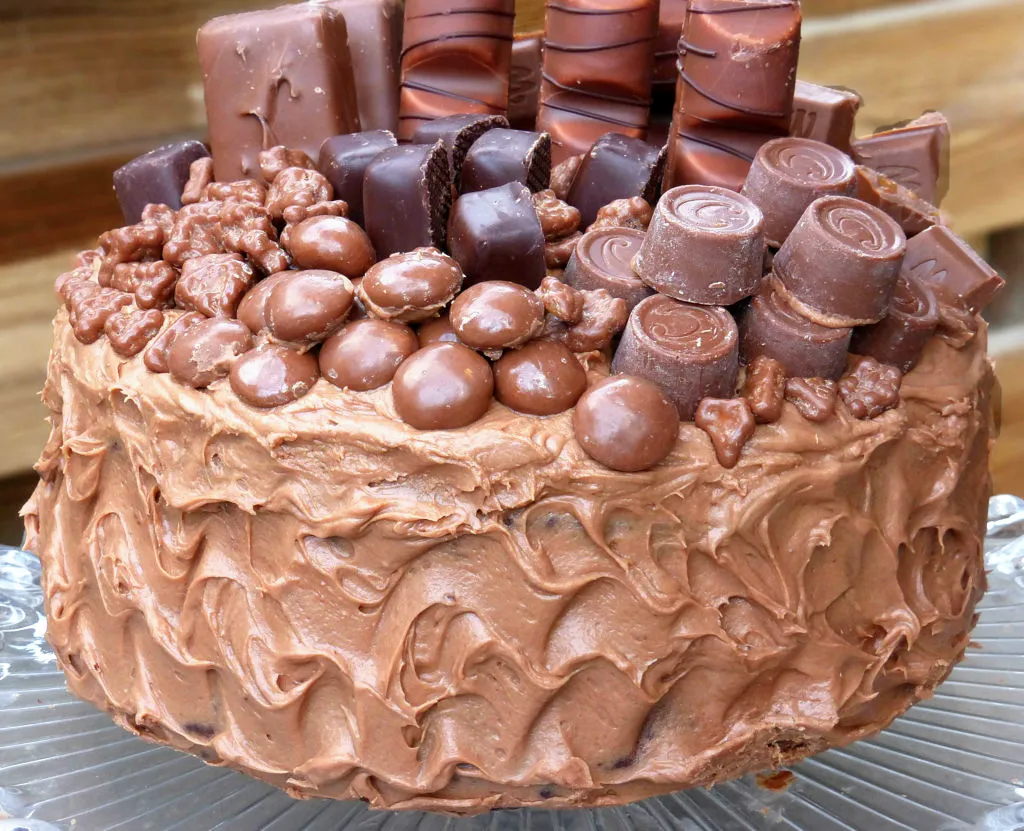
Chocolate overload cake for a birthday celebration
Although this chocolate overload cake might look pretty in the photos, the road to getting it there was anything but smooth. It caused me more than a few hair-raising, stress-sweaty moments along the way. The pressure was real: this cake wasn’t just for fun; it was for my 12-year-old son’s birthday. And you know how that goes. Birthday cakes matter. They’re not just dessert, they’re centrepieces. Memories. Expectations.
And somehow, when the stakes are high, when you really need everything to go right, that’s precisely when things decide to go off the rails. Especially when you’re baking for guests. It’s like the kitchen knows you’re under pressure and starts playing tricks on you. Ingredients you always have mysteriously disappear. Timers beep too soon. And of course, you start questioning every step, even the ones you’ve done a hundred times before.
This cake was no exception. In fact, it tested me every step of the way.
What is an overload cake?
If you’ve never heard of an overload cake, let me fill you in. It’s exactly what it sounds like. An overload cake is a glorious celebration of all things indulgent and excessive, piled high with layers of cake, frosting, and a dazzling array of toppings that push chocolate decadence to the max. It’s the kind of cake that makes no apologies for being over the top. And honestly, why should it?
For this chocolate overload cake, I went all out with some of my favourite chocolate treats: creamy Kinder Bueno bars, chewy Snickers pieces, luscious Swedish Centre bars, and many more. Each bite delivers a different texture and burst of flavour, creating a spectacular chocolate party in your mouth.
This cake is not just for birthdays; it’s a statement. A cake that says, “Bring on the chocolate, bring on the fun, and don’t hold back!”
I loved this recipe so much that I created a cupcake version, too. Others agree: it has been shared over 12k times. Perfect for when you want that overload chocolate experience but in a smaller, portable package. The cupcakes pack all the same rich flavours and chocolate surprises, just in bite-sized form.
If you’re a chocoholic looking for your next baking obsession, this overload cake is the one to try. Just be warned: it’s seriously addictive.
Last-minute chocolate birthday cake
I’ll admit it: I’m somewhat of a procrastinator, and baking is definitely no exception. Naturally, I left everything to the very last minute. Because, of course, that’s what happens when something feels important, right? Spoiler alert: it’s never a good idea. As the clock ticked down, I found myself scrolling through Pinterest with growing desperation, searching for a chocolate cake recipe that looked both impressive and manageable.
That’s when I stumbled upon a stunning chocolate mint cake by The Sweetest Menu. The moment I saw the photo, I was hooked. The sponge was a deep, luscious dark that you could almost taste through the screen. It looked rich, moist, and utterly irresistible. Although I omitted the mint flavour for this particular cake, it is definitely something I will try in the future.
What really caught my eye about the recipe was that it used oil instead of butter, which promised a different kind of texture: lighter and more tender, I hoped. Plus, the recipe called for hot water to be added just before baking, which was a new technique for me and piqued my curiosity. Feeling adventurous (and slightly desperate), I decided to dive in and give it a go.
Baking with kids: A rollercoaster of fun and fails
Baking with my eight-year-old, who suddenly decided baking is cool (how awesome is that?), was an absolute joy. We jumped right in, measuring, mixing, and laughing together. For a while, everything was smooth sailing. The perfect recipe for a fun baking session with kids.
But then came the moment to add the hot water. The batter suddenly looked terrifyingly wrong. So runny and strange. I seriously started to doubt if this cake would turn out at all. On top of that, I realised at the very last minute that I’d forgotten to add the coffee, a secret ingredient I always use in chocolate cakes to deepen the flavour. My original plan was to stir the coffee into the hot water, but it was too late by then. Despite my doubts and a heavy heart, I pushed the pans into the oven, not expecting much.
The best chocolate cake ever?
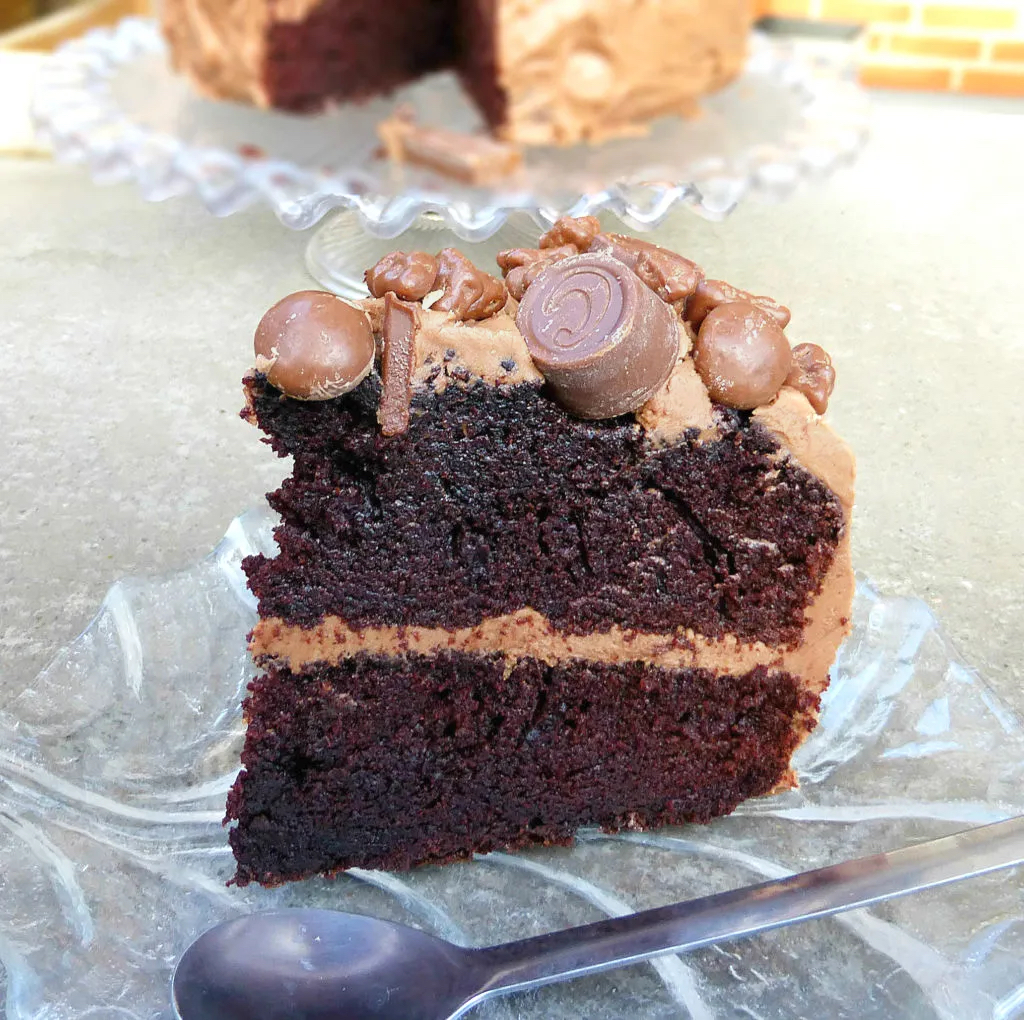
How wrong can a girl be? Very wrong, it turns out. What started as a doubtful experiment turned into a spectacular success. The sponge ended up being one of the best cakes I’ve ever baked. It had that deep, rich, dark colour I hoped for, exactly as anticipated, and was incredibly moist and tender.
Each bite was a heavenly experience, full of intense chocolate flavour that felt indulgent without being heavy. It was the kind of chocolate cake you dream about but rarely manage to recreate at home. Whether you’re baking for a special birthday, a celebration, or just because you’re craving something truly delicious, this cake will not disappoint.
Honestly, it’s a cake that makes you want to bake it again and again. Simply because sometimes, your family deserve something this good.
Nutella cream cheese frosting
Next up: the frosting. The good news? I chose a Nutella cream cheese frosting, and let me tell you, it was an absolute game changer. Silky, rich, and just the right balance of sweet and tangy, this frosting completely won me over. After this, I don’t think I’ll ever want to go back to traditional fudge frosting. Dee-vine, seriously.
Now for the bad news. I had grand plans to create a stunning “naked cake” with just a thin layer of frosting on the sides to let the cake shine through. Then, topped with a glossy, elegant ganache drip. But there was one major problem: the top of the cake wasn’t flat. Yes, I know you’re supposed to trim the cake to get that perfect surface, but honestly, who wants to waste cake? Not me.
Without a level top, the ganache drip turned into more of a chocolate mudslide than the graceful cascade I had envisioned. So, I had to abandon the naked cake dream and opt for a thick, swirled layer of frosting instead. I then topped it with my chocolate stash.
After hours of decorating and still not feeling satisfied, I gave up and went to bed. But in the morning, with fresh eyes, I was actually pleasantly surprised. It wasn’t what I had originally planned, but it was joyful, full of chocolate, and exactly what my son wanted.
Chocolate cake for 12 people
This generously sized birthday cake yields between 10 and 14 slices, making it perfect for sharing with family and friends. Whether you’re celebrating a special occasion or simply craving a chocolate feast, this cake has enough to go around, or to keep all to yourself if you’re feeling indulgent.
Its rich, moist layers and decadent frosting mean each slice is packed with flavour and satisfaction. So, whether you’re feeding a crowd or treating a handful of serious chocolate lovers, this cake will bring plenty of smiles and happy taste buds to the table.
And if you find yourself with leftovers (unlikely, but possible), it keeps well for a few days, although good luck resisting going back for seconds.

One layer chocolate fudge cake
Dense 6-inch one layer chocolate fudge cake
Kärleksmums (Swedish chocolate sheet cake)
Chocolate cake with date chocolate frosting
Blueberry white chocolate mud cake
Almost tiramisu espresso chocolate cake
Chocolate Overload Cake
Ingredients
Cake:
- 280g (2⅓ cups) flour (see note 1)
- 80g (¾ cup) cocoa powder
- 1 tsp baking powder
- 1½ tsp baking soda
- 300g (1½ cups) white sugar
- 90g (½ cup) brown sugar
- 250ml (1 cup) milk (see note 2)
- 2 tsp vanilla extract
- 180ml (¾ cup) vegetable oil
- 3 eggs (large)
- 250ml (1 cup) hot water
- 1 tbsp instant coffee
Frosting:
- 150g (½ cup + 3 tbsp) butter (softened)
- 200g (¾ cup + 2 tbsp) cream cheese
- 200g (½ cup + 3 tbsp) Nutella
- 250g (2 cups) icing / confectioners' / powdered sugar
Decoration:
- Any chocolate or candy you like (and as much as you want)
Instructions
Cake:
- Preheat the oven to 180°C (350°F) and line and/or grease two 8" / 20cm pans.
- In a large bowl, sift the flour, cocoa, baking powder and baking soda. Stir in the white and brown sugar.
- In a separate bowl, whisk the milk, vanilla extract, oil and eggs until well combined.
- Add the wet ingredients to the dry and fold together.
- Add the coffee to the hot water.
- Slowly add the coffee/water and stir until everything comes together. Don't overmix, there will still be a few lumps left in the batter (also note that the batter is supposed to be runny, so don't panic!).
- Divide between the two prepared pans as equally as you can and then bake side by side for around 30-35 minutes. The cakes are ready when the tops spring back lightly when pressed, and a skewer inserted in the centre comes out clean
- Remove from the oven and leave the cakes in the pans for around 15 minutes before turning out onto a wire rack to cool completely.
Frosting:
- In the meantime, prepare the frosting. Beat the butter and cream cheese together until light and smooth, then add the Nutella. Finally add as much icing sugar as is needed to achieve a thick frosting consistency.
Assembly:
- Carefully slice off the tops of both cakes (if they are uneven).
- On the flat side of one of the cakes, smooth over some of the frosting (enough to give a nice coverage).
- Place the other cake on top and gently push down.
- Smooth the remaining frosting all over the cake, making a pretty pattern (as mentioned above).
Decoration:
- Pile any chocolate or candy you like on top. Add this while the frosting is still soft and not set.
- Chill in the fridge for at least an hour to allow the frosting to firm up, or overnight if you prefer.
- Cut into slices and serve. Enjoy!
Notes
- You can use all-purpose (plain) flour in place of spelt flour. Just use the same measurements as specified.
- The original recipe called for buttermilk but I used 2% milk.


3 thoughts on “Ultimate Chocolate Overload Birthday Cake with Nutella Frosting”